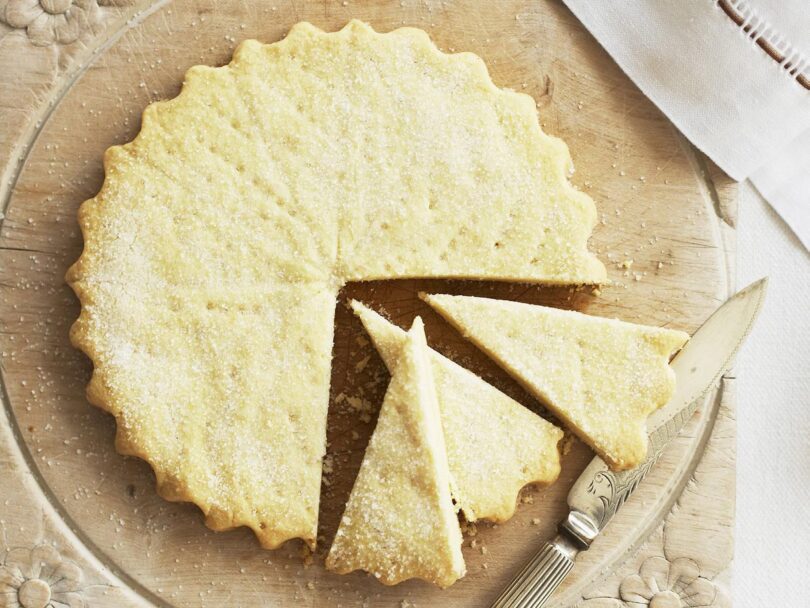
If, like me, you think shortbread should be sweet butter with only enough flour to just hold it together, then this is the recipe for you. The secret to the success of our traditional shortbread recipe is the addition of rice flour. While some shortbread recipes use only plain flour, by adding rice flour you get a crisper, almost sandy – in a good way – biscuit. While shortbread can be cut into squares, rectangles or rounds, our traditional shortbread recipe is shaped as petticoat tails, a name attributed by Mary Queen of Scots, who thought the pretty curved triangles resembled petticoats. When shortbread was first devised butter was expensive, so it was a treat designated for special occasions. With fresh butter now readily available and this recipe in hand, you can have this glorious buttery sweet on tap all year around.
Why is it called shortbread?
These cookies are called Shortbread because the term “short” is used to describe cookies and pastries with a tender, crumbly melt-in-your-mouth texture. The same terminology is used for shortcrust pastries used in things like Quiche and Pecan Pie.
It’s considered an art to achieve this buttery delicate texture – but it’s actually REALLY EASY!
Recipe Notes:
1. RICE FLOUR:
This recipe makes shortbread that’s tender enough as it is so you don’t need rice flour. You can use it if you want – the difference is marginal. Just swap out ¼ cup of the flour with rice flour, add it with the flour.
Some recipes say you can use cornstarch/cornflour as well. I personally find this leaves a bit of a chalky taste.
2. SUGAR:
I like to use icing sugar because the grains are finer so you get a smoother finish on the surface. Also icing sugar is about 1/2 the sweetness of sugar by volume.
There are 2 types of icing sugar in Australia – Soft and Pure. Either works (I can’t tell difference in outcome) – I usually use Soft because it’s what I always have.
The icing sugar can be substituted with 1/2 cup of white sugar, preferably caster/superfine sugar + 2 tbsp flour.
3. FOOD PROCESSOR / RUBBING BUTTER:
Instead of creaming softened butter, the other method is to rub the butter in. This yields a more crumbly shortbread but the surface is rougher – see comparison photo in post. If you wish to use this method (which I believe is the original traditional method, think pre beater days!), this is how to do it:
* Cut COLD butter into 1cm / 2/5” cubes;
* Food processor: place all the flour, sugar and butter in a food processor. Pulse 20 times, then whizz on high for 25 seconds until it forms breadcrumbs. Turn out onto work surface and proceed with recipe;
* Rubbing with fingers: Place all the flour and sugar in a bowl, then add butter. Use fingertips to rub butter into flour until it forms breadcrumbs (see video for how it should look). Turn out onto work surface and proceed with recipe.
4. HOT WEATHER WARNING!
If it is super hot where you are and/or you have very hot hands with the butter rubbing method, press the dough into the pan then refrigerate for 20 minutes or until chilled.
5. PRECUTTING:
To cut out into shapes before baking, it is best to add 2 tbsp flour to make a dough that won’t spread as much when baking. Then roll out into 1 cm / 2/5” thickness and cut into desired shape, place on a baking paper lined tray and refrigerate for 30 minutes. Preheat oven to 150C/300F (fan forced) or 170C/340F (standard) then bake for 15 minutes until the edges are just starting to the brown but the surface is still a pale gold.
6. METHOD NOTES:
Partial cook before cutting and pricking (if you do when fully raw, the cuts/pricks disappear when baked);
Cutting cooked biscuit has tendency to crack surface a bit – not as neat;
Leave the shortbread in the oven to cool. This is a tip I picked up from Cooks’ Illustrated – it allows the biscuit to finish cooking without the surface browning (shortbread cookies should be very pale).
7. MEASURING CUPS IN DIFFERENT COUNTRIES: Shortbread is actually quite forgiving. I’ve tested this using both US and Australian measures and I couldn’t tell the difference.
8. Store in an airtight container for 3 days or in the freezer for up to 2 months.





Leave a Comment